Before going on break, I agreed to take on a small project so we can hit the ground running with a working aerial platform for class. I have had a DJI Matrice 100 for a few months now and have grown quite accustomed to its operation. When I was given the option to mount a Micasense Red Edge on the platform, I took the project without question.
As a small requirement for this project, I had to use the Slick DQ-10 camera mount. This mount is a quick and simple way to mount a camera to an aerial platform which will allow us to transfer the camera between my Matrice and other aerial vehicles.
I also had a small requirement of my own for this system. I didn’t want the camera to interfere with the use of a standard gimbal camera in the camera socket on the front of the quadcopter. This creates a rather large limitation on mounting options since the Red Edge and Slick mount take a lot of room under the airframe. Installing it behind the batteries could be done but the extra weight and aerodynamic drag could cause the airframe to loose flight time.
Leg extenders
To get around these space requirements, I started looking at increasing the height between the ground and the camera. Commercial options do exist such as the €70 leg extender kit available from droneparts.de but this is quite expensive for something that I could easily build on my own. I instead looked to the 3D printer to make it using PETG.
First attempts at 3D printing the leg extenders ended up being a relatively problematic endeavor. First prints in PETG turned out just fine but were slightly oversized. They wouldn’t thread into the airframe without the use of pliers or other hand tools. Further prints with slightly reduced dimensions didn’t do much better.
Not wanting to risk breaking the threads off in the frame, I decided to hold off on this project until I get some different filament which produces less friction with the threads. I will be redoing it with PLA to see if the reduced friction of the material might make the threads more cooperative. If that does not work, I will probably find an alternative material to manufacture the extenders such as aluminum.
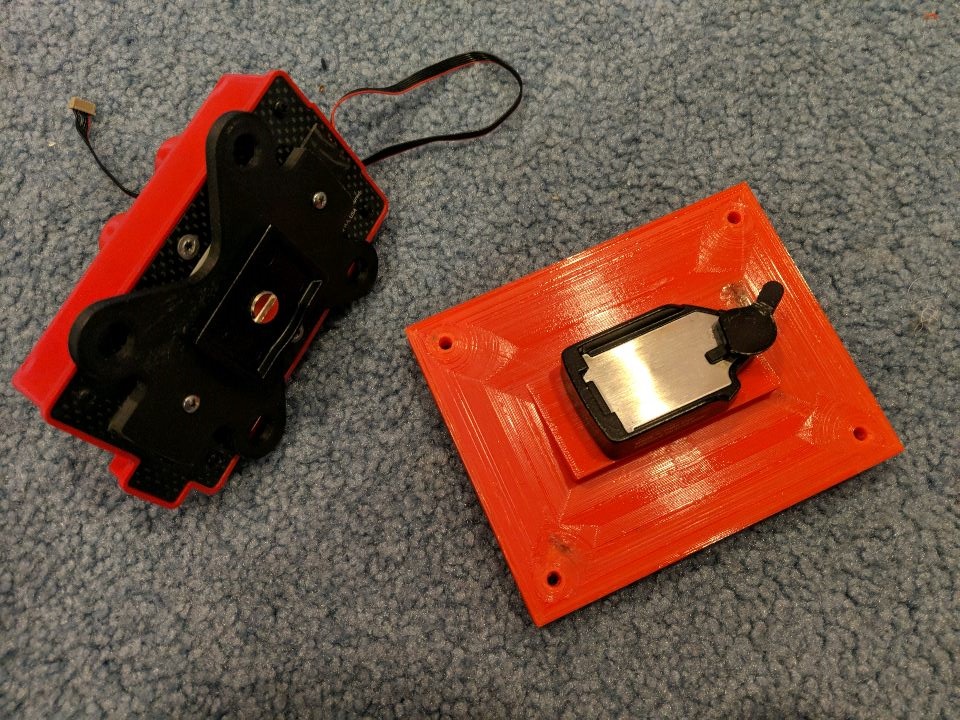
Camera Mount
With the leg extenders being put on hold, I moved on to the mount for the camera. This is where I started modeling a lot of prototypes in Catia V5 for different possible configurations of the camera. I eventually settled on a simple design which mounts the camera at a 15 degree angle facing forward. This will keep the camera pointing further down when in forward flight. The slick mount is fastened to the part using a nut behind the part. The part is also attached to the Matrice using four M3 screws that go into the underside of the battery holder.
With a basic design completed, it was time to print it. I had some left over PETG from a previous project and decided to use it for this print. I only began to realize how much of a mistake this was after the first couple prints failed.
My printer is a heavily modified CR-10 with a PEI build plate, E3D Volcano hot end, and auto bed leveling. Since it was the break, I had to take it with me to my parents house to work on it there. The filament was able to print without problem at the apartment but at my parents place it failed consistently. Parts warped off the bed mid print, the nozzle leaked around the threads, and many other problems occurred. I believe some of these problems can be attributed to the difference in ambient air temperature. Further testing would be needed to confirm this.
After lots of tuning of the printer, I got a working model that will work well enough for the Matrice. It does have some warping and nozzle leaking that required some touching up to make it functional but should be good enough if shimmed with washers. I was very pleased with how well I measured the Slick mount for the cad model as it didn’t require any modifications to mount.

GPS Mast
When designing the GPS mast, I decided that the mast would have to be removable or collapsible so the quad could be put back into its case. Wanting to avoid more 3D printer troubles, I decided to just order one identical to the other GPS mast. I found one on Amazon for $13 and had it installed within 10 minutes of receiving it.
I still have to install the GPS and downwelling light sensor onto the mast but this should be a simple task. I am also going to have to extend the cable between the GPS and camera.
Over all, I believe I have probably spent close to 2 hours modeling in Catia and another 3-4 hours checking on the printer. The printer has however taken significantly longer than that to print the camera mount with some attempts taking 17 hours. At this point I believe I am going to switch back to PLA filament since it has a higher success rate on my printer than the PETG I was experimenting with here.